One thing about the world of technology, there’s no shortage of jargon. Or acronyms. Luckily, if you pick the right ones, they come in pretty handy.
Recently, there has been a lot of discussion about “Zero-Trust” (ZT) architectures. The premise is that no data transaction should be trusted, regardless of where it originated. Furthermore, within each transaction, there should be proof of ownership.
Print methods have long been ignored in this area of zero trust, probably because printing was originally a local phenomenon, so it was generally considered to be “air gapped” from any network security issues. Printing, however, has long been part of the network schema… though ignorance of security has remained. We have seen recent exploits in this area with the potential to cause real security issues in Windows platforms. I am confident that organizations around the world have taken the necessary steps to mitigate the risk of this exploit, but I hope that in doing so, the same organizations now understand the necessity of securing their print environments and implementing zero trust networks.
Printed documents are yet another way to expose data. Moreover, once printed, there is no way to control the data that has been exposed. It is therefore very important to check who is attempting to print data as well as verify what data that individual is attempting to print.
Until recently, the way companies accomplished this was by securing control of the local machine. For instance, I have to log on to my laptop to write this Blog story. I furthermore have to communicate with Office 365 via my corporate network identity to use Word. If I want to save the document to my company network, the credentials to allow this are carried forward from my machine login, which has the authority to do this as well as many other things. If I walk away from my machine, however, and fail to lock the screen, then some unscrupulous individual can come behind me, access data in my name, print it and walk away with the goods. In my case, that’s not such a big deal as I have little access to important information. But what if I were a doctor or other healthcare provider? Or if I had access to sensitive competitive information? Then it could be a problem.
BYOD printing in a Zero Trust Environment
Now let’s frame this in a zero trust world. In that world, I may (and often do) carry with me a device that I own and maintain. This approach is commonly called “Bring Your Own Device,” or BYOD. The company does not care about my machine, so maybe I log in to my PC as an administrator. In the world of zero trust, that’s okay. The idea is that security enables me to do my work over the Internet such that I can work from home, from my favorite coffee shop, or from my workplace in the same way. This also means that the Internet connection provided for me at my workplace need not provide user-based security, as I cannot establish trust simply by my presence on the network.
To do my work, I log in to some secure resource, most commonly some flavor of encrypted website or virtual application environment. All of the data that flows over the wire is encrypted, so it’s not a problem that I’m on the open Internet.
In a virtual application environment, print is often controlled internally, or sometimes not even allowed. There remains the need to print in many circumstances, so print-time verification becomes necessary. This is accomplished by allowing users to define print devices using a mechanism that is outside of the operating system.
The key is to capture the print when it is initiated. Once captured, several things can occur. First, you can determine if there is a valid user ID associated with the print. Here, I clicked “Print” from my MS-Word screen and selected a printer:
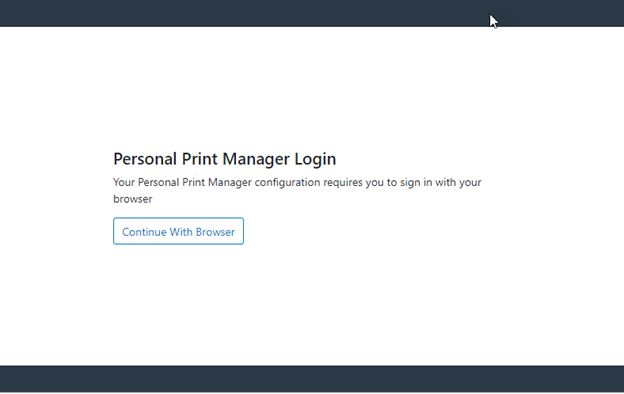
Note that I am asked to log in. This is a key point. Even if I were signed on to the PC as an Admin like the example earlier, I must provide my corporate credentials to print. Also note that this authentication is being done via a browser (but more on that later). I provide my corporate credentials and log in.
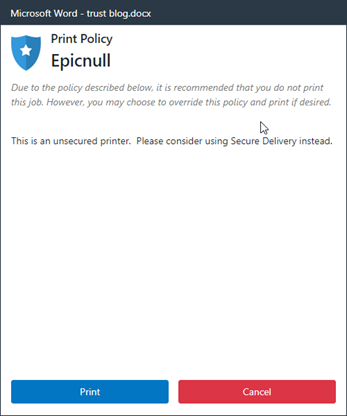
At this point, I’m logged in, so my user ID guy.tucker@lrs.com is associated with printing. Good first step. Now what? I can now look at print policies that I may have configured to control many things. Some could be simple items like whether the company wants to incur the costs of color printing, or maybe something more based on whether I SHOULD be printing that document. These policies can question the user, log the print attempt, and either block the print or allow the user to override the request.
These are just some simple examples; the full capabilities are much more extensive. In addition, Secure Print can be put in place. I have logged in with my corporate identity, so now I can send the data to a Personal Print Queue where it is held. Then I can go to a nearby printer, authenticate at the printer, and retrieve my jobs. This means that the vulnerable paper (containing sensitive information) does not sit in the printer’s output tray until I arrive. Obviously, this is even more secure.
Data at rest (the jobs waiting in a queue to be printed) and data in motion (the jobs traveling from the source to the printer) should always be encrypted. The Internet Print Protocol (IPP) facilitates this using the same encryption methods that are used for the Web. Again, never trusted, always verified.
But what about authentication? This is an area that has received a great deal of scrutiny over the last few years. The key here is to allow an organization to use whatever methods and factors they want and control it from a single source. In the past, simple methods like Microsoft’s Active Directory (AD) or other LDAP methods were used. Unfortunately, those were easily hacked and had zero flexibility in their structure. Companies wanted to use more than just a user ID and password to log in. Perhaps some associated card or dongle, or a multi factor authentication (MFA) ping to a phone was considered necessary. Another problem came from mergers and acquisitions. A company might end up with two, three, or twenty different AD domains where users could reside and maybe have duplicate IDs.
Enter the world of Open ID Connect (OIDC).
OIDC is a web-service-based secure mechanism that can act as a proxy for these many possibilities. Perhaps your OIDC provider “federates” all the domains. So I log in as guy.tucker@lrs.com, and the OIDC provider then works behind the scenes to authenticate to the correct AD domain. Or maybe I want to require MFA for all my users. Without an OIDC provider, this burden means that the application has to figure out all of these possibilities.
There are standards dictated by RFC 6749 on all the necessary methods and attributes to deal with an OIDC provider. But here’s the problem – none of the OIDC providers, including the ones that contribute to the standard, adhere strictly to the standard! If I want to be able to work with any OIDC provider, how do I do that?
(Warning: acronyms ahead – Editor)
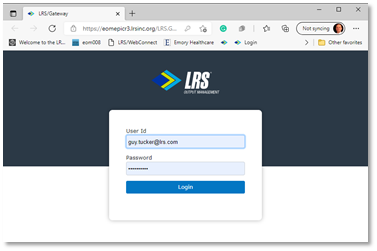
Well, the answer is to also become an OIDC provider. The application can then be left in its basic form and subcontract the authentication process to its own OIDC provider. In the case of LRS software, we created the LRS/Gateway component. When I attempt to print, the LRS Personal Print Manager (PPM) module will check to see if I am logged on. If not, it uses the default browser through the LRS/Gateway to do the authentication. Remember the browser example earlier? This method is used as it is generally available and controllable by an organization or user. Better to use this well-known method than attempt to bury the same functionality in the calling application.
If LRS/Gateway is using AD directly, then the user info is immediately authenticated and the “OK” is passed back to PPM. This OK is in the form of a Token that PPM can use for future requests. In this way, each request contains that “license to print” and certifies that I am who I say I am. If a company prefers to use another provider like Azure AD, Okta, Ping, iWelcome or many others of this kind, then the LRS/Gateway redirects authentication to that secondary source. Easy as ABC.
Here is my login from before, for instance, as defined to Okta:
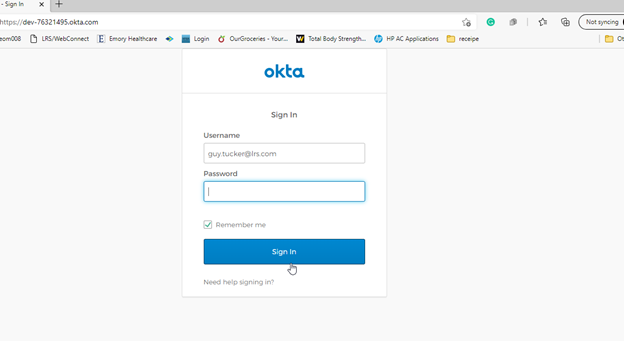
So Okta follows whatever rules the company has set up, and then the OK goes back to the LRS/Gateway, and the process continues.
In both of these cases, AD and Okta, I have been verified, so my print can then use those credentials for verification. Any print transaction from then on can also be scrutinized to make sure that it has my token, and that no company policies have been violated.
Trust nothing, verify everything, never stop trying to safeguard the valuable data contained in your documents. It’s not just a good theory. It’s possible today and can spare you and your organization a lot of pain.